
THE ARCHOSAUR ASYLUM VOL.1: "TWINNING" CUT AND KEY UPDATE
- Matt Ramieri
- Jul 4, 2022
- 4 min read
Updated: Aug 1, 2022

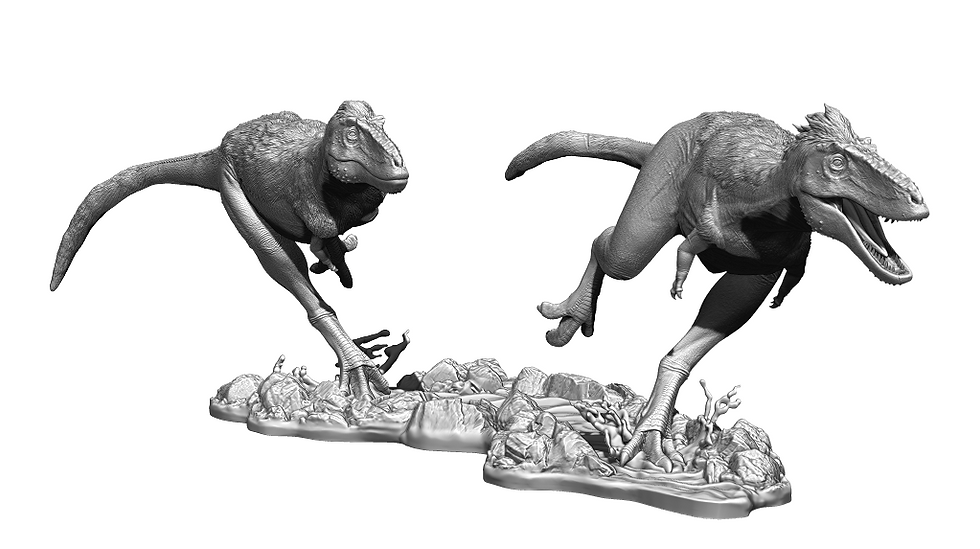
Welcome to the first installment of the Archosaur Asylum blog. Today we will update you on the latest development with the 1:20 scale "Twinning" juvenile T. Rex twins running paleoart model kit by me, Matt Ramieri.
I know that each of you who have purchased a limited edition 1:20 scale "Twinning" scientifically accurate paleoart model kit is looking forward to getting your model. I also realize that you are probably watching us produce and promote other models in the meantime. You might be wondering:
"Are they ever going to ship my "Twinning" model, or are they just messing around with everything else now that they have my money?!"
Well, that would be completely understandable if you are wondering that. So, let me tell you what is going on.
Since preorder, we have been hard at work trying to find the best way to publish the "cut" of the model. We use the term "cut" to represent how the model is divided and keyed so you can assemble it when you get it.
The original model is sculpted digitally in Zbrush, and then it has to be divided into a "cut" that makes it easy for you to assemble at home. In some cases, that process is pretty straightforward, and we get it right the first time out of the gate. However, sometimes it is a little bit more complicated than that.
In this case, the "Twinning" model turned out to be a bit more complicated. We printed the prototype and found that although we could assemble the parts just fine, the model was very delicate, and the union between the characters and the base was precarious.

The original "Cut" also included a two-piece base because the only 3d printer we had access to had a build volume too small for a one-piece base.
I had initially designed the model with pegs that would fit into the characters' feet and the appropriate location in the base. The problem was that the connection between the dinosaurs and the water was very delicate. There is a lot of leverage on that peg because the dinosaur is standing on one leg and leaning to the side. I could get the model set up and standing ( we used this setup for the pics on the website, for instance), but it was too easy to break... ask me how I know.
Furthermore, the only 3D printer we had access to at the time had to small a build volume to print the base all in one piece. That is why you see a two-part base above. Also, you will notice that the water splashes are separate from the base. That is because (to keep material costs down and maximize machine time), we planned to mold the base, then cast each base in the final kits with castable liquid resin instead of printing each base.
3d printing resin is costly even though it is of equal quality to the premium liquid cast resin we use. Not only is the liquid cast resin less expensive than the 3d printable resin, but it is also much faster to cast the bases than printing them.
We use the highest-resolution 3d printers in the most detailed setting available in the market today. The printers yield unbelievable levels of resolution, but they take their time doing it. To print one character from the set (Gerladina for instance), takes 44 hours and 15 minutes! That is because it is printing 6,799 layers at a staggering .025 mm layer height.

Even now that we have access to a printer with a much larger build volume, it still takes the same amount of time to print the same amount of material. Look at the build plate with two sets of twins and a few extra parts. This build is set to take 98 hours! So, you are looking at nearly a week of printing for two model kits, not considering the base. This accounts for a lot of the production delays.

Once I saw how precarious and delicate the original design was, I had to devise another plan. In addition to the poor pinning method, the tiny splashes were challenging to make stay in their corresponding slot in the base, so I needed a solution for that as well. So, now that you have an idea of what goes into getting one of these from the digital state to the physical form, I will expound on our process to bring you the best model possible.
As I mentioned above, I would be molding the base, so those tiny splashes sticking up everywhere would make molding and casting a problem. So, I decided to merge the splashes with the character's feet. This way each set f splashes will be 3d printed for each model kit with the character's foot.
Furthermore, I needed a better, more robust union between the base and the character, so I decided to cut a plate out of the base and attach it to the foot as well. At this point, we had a platform that worked to allow for generous gluing, but I still was not entirely satisfied. With this arrangement, you would have to stand there and hold the dinosaur in place while the glue dried. Once the glue dried, the union was strong, but having to hold it there is a pain in the ass.
So, I went back to the drawing board. I added a small block to the bottom of the platform to allow the dino to snap into place. Now, you can glue the bottom, snap it into the square cut-away on the base, and walk away.

The new cut design with quality union.


Well, now you get the idea. I am pleased to say that we now have a molded and cast base, and the new cut works swimmingly. Check out the models below. The middle set is the new cut with the Jagger and Gerladina just standing with no glue in place. They are held up entirely by the cut and ket design.
We are on the move to produce model kits for shipment as I write this. The first four sets are printing now, and the printers will be used exclusively to create "Twinning" model kits until all preorders are fulfilled.


Oh, and we also created a 1:35 scale version


Comments